Stock Photos from pattang/Shutterstock
This post may contain affiliate links. If you make a purchase, My Modern Met may earn an affiliate commission. Please read our disclosure for more info.
There’s a simple secret to mastering how to draw anything in a realistic way—learn about its internal structure before you ever put pencil to paper. In doing this, you’ll be better informed about why something looks the way it does, and you’ll have a clearer idea of how your subject moves.
This is perhaps best illustrated in the human head. By learning how to draw a skull, it makes the task of sketching the nose, lips, and eyes less confusing. When you get to the base of the human head, you can see the nooks and crannies that make us who we are, and you’ll start to connect the dots over why our noses pitch forward and our eyes sit further back.
It’s a necessary and helpful exercise to learn how to draw a skull—even if you’ve rendered a portrait before. In this tutorial, we’ll look at proportions of the head as well as an easy step-by-step process to sketching the bones.
Grab your favorite drawing supplies to get started. We recommend a sketchpad, multiple graphite pencils (in varying grades), and an eraser. To learn more about the best pencils for sketching, check out our guide to the drawing utensils that professionals and enthusiasts love, as well as the types of paper that are ideal for dry media.
Why should you learn to draw a skull?
One of the biggest advantages to drawing a skull is that you’re getting to the bare bones of what’s underneath our skin. By studying how the nose looks when it’s not covered by the epidermis and how the teeth appear without lips, it’s easier to get an understanding of their proportions as well as how all of these things interact.
Facial Proportions You Should Know
Before we begin drawing, here are some of the basic proportions of the human face. They will vary, of course, depending on the person, but they are helpful to know for when you want to check if your drawing is balanced.
These are the basics of a face seen from a straight-on view.
When you look at the face, it is generally wider at the top and tapers at the bottom of the chin. (Like an upside-down egg!) These are a few things to keep in mind, with the width of an eye as being a standard for measurement (keep in mind that the eye is smaller than the eye socket).
- You can divide the face into four sections. The eyes are placed on the horizontal axis and the nose constitutes the vertical middle of the face.
- The space between the eyes is typically the width of one eye.
- The space between the midline of the eye and the bottom of the nose is a distance of one eye.
- The entire width of a face is about five eyes wide.
Here's how to draw a skull step-by-step.

Once you’re ready to begin drawing, find a source photo for a skull. Another alternative is to buy a replica skull and sketch from that to improve your direct observation skills. (It will also work great in still lifes!)
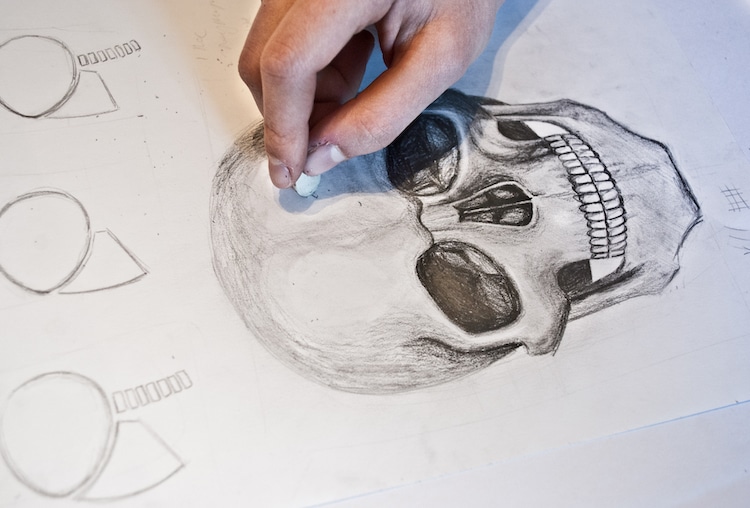
Step 1: Start with the basics.
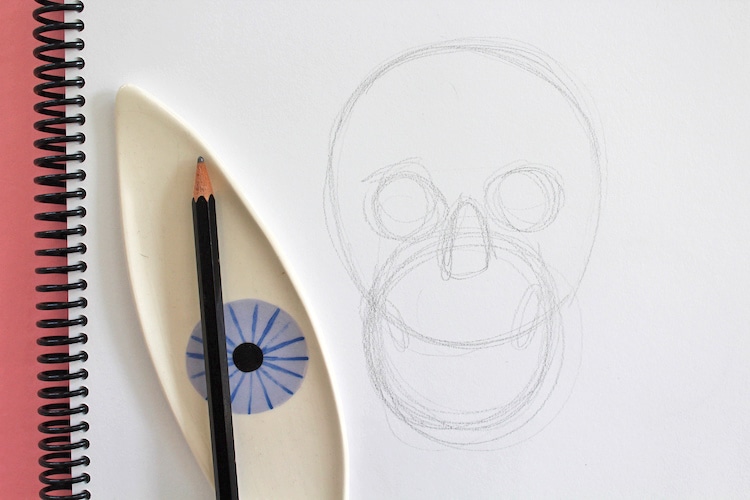
Photo & art: Sara Barnes / My Modern Met
Begin by sketching the most fundamental shapes you see. The upper part of the skull—which has things like the frontal bone and nasal bone—will be represented by a large circle. The lower jawbone (mandible) will be a smaller circle that overlaps with it. Where the two intersect is where your jaw joint moves.
At this point, also pencil in where the eye sockets will be as well as the nasal cavity.
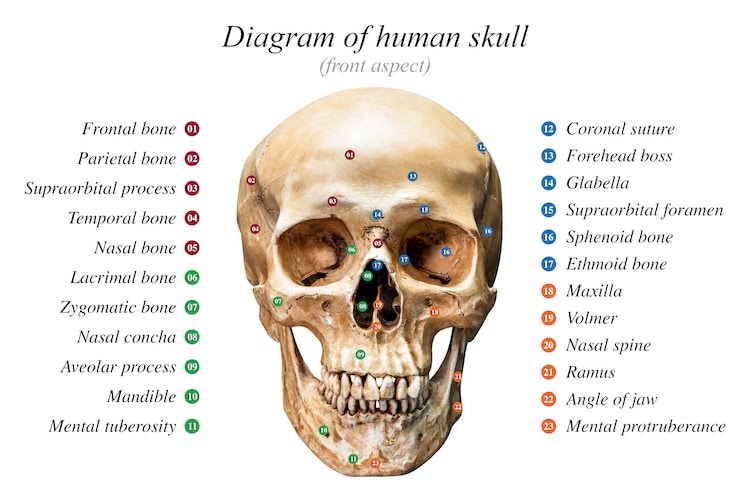
Step 2: Refine the fundamental shapes with contour lines.
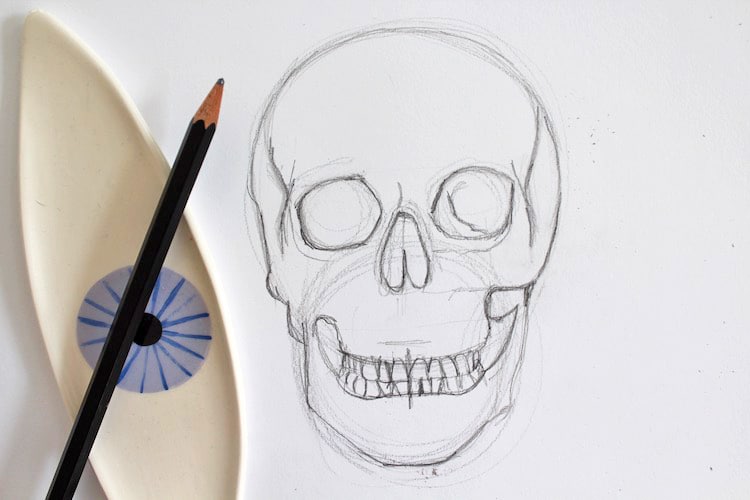
Photo & art: Sara Barnes / My Modern Met
The basic shapes are a good starting point for your sketching, but to make your skull drawing appear realistic, you need to refine your composition with contour lines. Observe the nuances of the skull while following the guidelines that you set. Notice what's contained above and below the horizontal and vertical lines of the face. The nasal cavity, for instance, will intersect with the vertical line you drew.
This is the most important stage of your entire drawing. It’s worth it to take extra time to really look at the features of the skull. Ask yourself questions along the way. How big is the nose compared to the eye sockets? How many teeth are there? What is the curve of the mouth, and where do the teeth fit into that?
Remember, it’s a challenge to draw a skull. But if you take the time to observe and to double-check your proportions, you’ll eventually have an accurate sketch.